| The following is a summary of a Log home restoration, which was carried out by one of my customers
during the summer of 2007. The repair was broken down into two parts with three distinct stages.
Part one being a log ōFACEö repair and part two being a log ōENDö repair. The three stages in each part consisted of
|
|
|
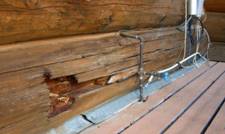
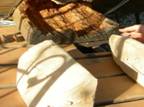
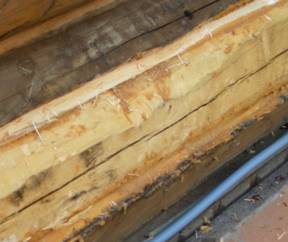
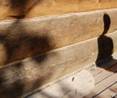
| This particular home had extensive damage along one of its large base logs accompanied with some rotten corners and log ends.
It was determined the deterioration was caused by two distinct issues.
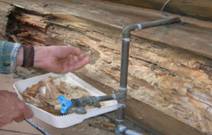
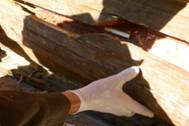
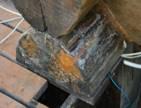
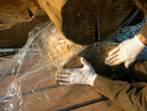
1) As you can see in the above photo a water pipe drilled through the top of the log brought a lot of condensation into the log during the summer months.
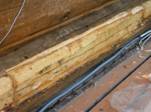
2) A long and deep check or crack in the log faced up, which brought additional snow and rainwater into the log.
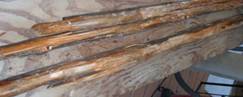
The end result was obvious, extensive internal rot and external surface failure in one area. Using a hammer, it was determined that the damaged extended from the corner for about 18 feet. Some rot was also discovered in a second base log where they meet at a corner. Included in this 18 feet of deteriorated wood, numerous hollows were discovered that would require rebuilding. Finally, one small end piece on another base log at the back of the house had a hollow sound when tapped with a mallet, indicating that there was a small amount of internal dry rot there. |
 |
Due to the location of the logs, removal and replacement was not practical. Because these logs were still structurally sound, meaning they still had the ability too support weight restoration was possible without their removal. Logs have been restored even when they have passed the point of being more than 50% deteriorated. Each case is different. The two products were recommended for this project as they work in conjunction with each other were 1) CPES (Clear Penetrating Epoxy Sealer) and 2) Lay-up and Laminating Epoxy Resin (L-L). As both these products are derived from wood and not petroleum they are the preferred choice. CPES is very thin so it soaks deep into the damaged wood gluing the wood fibers back together and, at the same time makes the wood less palatable to fungi. L-L is mixed with sawdust to a make thick adhesive paste acting as filler and bonding agent. |
 |
 |
 |
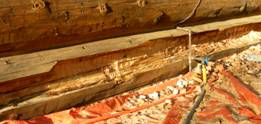
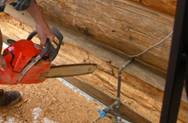
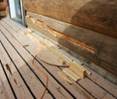
A reciprocating saw was used to remove the face of the rotted area on both the main log and the end log. These pieces were set aside where they would not get damaged and could be cleaned up later. The deteriorated wood was then removed with a chain saw, definitely one tool that is a must for this type of work. Removal of the rotten wood should be more or less done so that the cavity is shape to easily accept new dimensional lumber. The more time spent in this step will result in an easier finishing job and less product requirement. |
 |
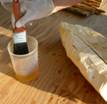
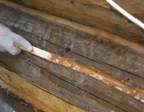
Remove any loose rot from the inside of the exterior pieces and then saturate them with CPES. These pieces will later put back in stage 3 of the restoration process. CPES can be applied with a brush like paint. The wood maintains a ōwet lookö for a few minutes when saturation is complete. |
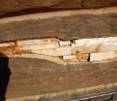
| You will need to cut some dimension lumber to fill in the space that you have created in the damaged logs. I used some older 6 x 6 fence posts, which were shaped with a chain saw. These larger pieces filled the majority of the cavity. You will then need to cut and shape smaller pieces to fill in around the larger pieces. I used a table saw and cut varying thicknesses off a two by four to make up these smaller pieces. |
 |
 |
 |
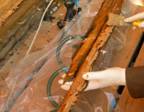
| Once you have confirmed that your pieces will fill the space you start to treat the wood. Both the cavity and the wood used to fill the cavity must be treated with CPES. For the large cavity I used a pump style pesticide sprayer. Once you have made several passes and the CPES does not readily soak in, saturation is complete. You can go through a lot of CPES if you do not do a good job of removing the rotted wood. Damaged wood soaks up much more CPES than healthy wood so try and remove as much as you can. It is not always necessary to remove old rot by mechanical means, what can be removed using your hands is all that is required but in the case it made sense. As previously mentioned a good fit with the dimensional lumber that you are installing saves you a lot of finishing work. |
 |
 |
Once the cavity is treated, the new pieces that you are rebuilding the log with should also be treated. As these pieces were small bushing on CPES was the best way to do this. You will find that it soaks in a bit, however two to three coats in succession usually does it. Do NOT let it dry between coats. After you are done treating the wood let sit for a few days to completely dry. |
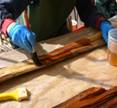
| When you are satisfied that your replacement wood pieces are ready to be installed, mix up a small bath of Lay-up and Laminating Epoxy Resin. ItÆs advisable to thoroughly mix the two parts before you add the sawdust. ONLY add a little at a time till you become familiar with how much sawdust is required to make the correct consistency. Cream of wheat or porridge consistency usually is whatÆs for this best of type of situation. Once the lay-up mixture is ready ōbutterö it into the cavity and then on the replacement wood. Insert this wood into the cavity starting with the bigger pieces. Then take the smaller treated pieces and butter them with lay-up and fit them into the cavity. The initial cavity fill is done when you have backfilled it within about an inch from the log surface. You can then take some poly (clear plastic i.e.. vapour barrier) and cove the work area working the lay-up into the shape of the log. Once dry, the poly will pull away from the dried epoxy like tape. |
 |
 |
 |
| Once the interior rebuild has cured, it is time to replace the exterior pieces that you cut out to access the rotten interior. To achieve this you need to fit the exterior pieces so they match the rest of the log. This will require some chiseling of the exterior and interior surfaces to get a satisfactory fit. In this particular rebuild approximately one inch was left between the surface on the exterior of the log, and the filler wood [the old 4 x 4 posts] If a larger dimension, say two inches of space was left then less chiseling would be required however, more laminating resin would be used as the fit will not be as tight. Be careful not to chisel the exterior surfaces of the log face, as this will affect the natural look of the log. Once you are satisfied with the fit, mix up another batch of L-L. When using sawdust mixed with the Lay-up resin (L-L) try and select sawdust that matches the natural wood colour of the log. These logs were pine so some sawdust was made by ripping some spruce and screening the sawdust to get a good match. Coastal Epoxy Restoration can also supply pigment powders to aid in colour matching. |
 |
 |
 |
 |
 |
 |
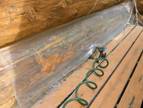
| ItÆs now time to put back the original outer surface. Start by buttering in any small wood pieces, which go under the face, then, butter the back of the exterior piece and the interior surface. The face pieces are then fitted and can be held in place by some partially driven nails, which are removed after the project is dry. Use an empty caulking tube that is filled with a lay-up sawdust mixture to fill checks and holes in the restored area. Finish by placing poly over the repair area and smoothing the seams. This also protects your project from the weather during curing. Once dry the poly can be removed and the log is ready to be fashioned as the rest of the logs in the home. |
 |
 |
 |
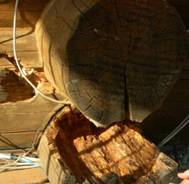
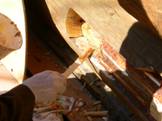
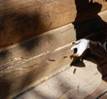
| The last repair that was carried out was on a ōbutt endö This area exhibited a hollow sound when hit with a mallet, indicating some dry rot.
For this repair, holes were drilled in to the rotten area about 4 inches apart.
I used a squeeze bottle that was supplied by Coastal Epoxy Restorations to inject CPES into the area.
Once again, the more the better as it slowly wicks along the wood grain and seals and helps preserves the damaged area.
When the area was completely saturated with CPES it was left to cure for a few days. Once dry you take an empty caulking tube and fill it with sawdust and lay-up moisture. The lay-up is then injected into the wood through the drill holes filling any small cavities left in the log. We at Coastal Epoxy Restorations Inc. wish to thank Torrie for submitting these photoÆs and below are some pointers that he discovered while dong the work.
All together this project took about 50 hours to complete. Although the epoxies are not cheap they are of excellent quality and the alternative which is log replacement; would be much more expensive and disruptive. |
 |
 |
 |
 |
Download a printable version of this paper. Email this article to a friend. Coastal Epoxy Restoration Inc. is located in British Columbia Canada |